

.webp)
.webp)
.webp)




.webp)
Learning how to vibe code a website or app starts with one simple idea: describe what you want in plain English, let AI generate the first version, then guide, test, and improve it until it works.
You can use Vibe coding to build a landing page, portfolio site, dashboard, internal tool, or simple web app without writing every line of code yourself. The real skill is not “coding without coding.” It is knowing what to ask for, how to review what AI creates, and when to fix, simplify, or rebuild.
AI-assisted development is now part of mainstream software work. Surveys found that 84% of developers use or plan to use AI tools, while 51% of professional developers use them daily.
In this guide, you’ll learn the practical workflow: plan your idea, choose the right tool, set up your project, write better prompts, build a website, create an app with AI, test it, optimize it, and decide when your prototype needs professional development support.
To vibe code a website or app, describe what you want in plain English, choose an AI coding tool, generate the first version, test each feature, fix issues with follow-up prompts, and deploy when the core workflow works. Start small and improve one section or feature at a time.
Yes. You can build a website with AI using tools like Bolt.new, Lovable, Replit, v0, or an AI website builder. You still need to review the layout, replace placeholder content, check mobile responsiveness, and optimize SEO before publishing.
Yes. You can create an app with AI if the app is simple, such as a dashboard, form-based tool, task manager, booking flow, or internal tool. For complex apps with payments, user data, integrations, or security needs, you should get a technical review before launch.
You need an AI coding tool, a project plan, a place to save code, and a deployment platform. Common tools include Cursor, Replit, Bolt.new, Lovable, GitHub Copilot, Supabase, Firebase, Vercel, Netlify, and GitHub.
The best way to learn how to vibe code is to start with a small project, write a clear prompt, test the output, and improve it step by step. Do not begin with a complex SaaS app. Start with a landing page, calculator, dashboard, or simple CRUD app.
Not exactly. Coding without coding means you do not manually write every line of code, but you still need to guide the AI, review the output, test features, fix bugs, and understand the basic structure of what was built.
Yes, for prototypes, MVPs, internal tools, and early product versions. But if the product handles real users, payments, private data, or business-critical workflows, it needs proper AI web development, security review, performance testing, and scalable architecture.
Vibe coding is AI-assisted development where you describe a website, app, feature, or fix in natural language, and an AI tool generates the code. Instead of writing every line manually, you guide the AI through prompts, feedback, testing, and refinements.
It sits between no-code tools and traditional development:
The term became mainstream after Andrej Karpathy popularized it, and Collins named “vibe coding” its Word of the Year 2025, defining it as turning natural language into computer code using AI. (1)
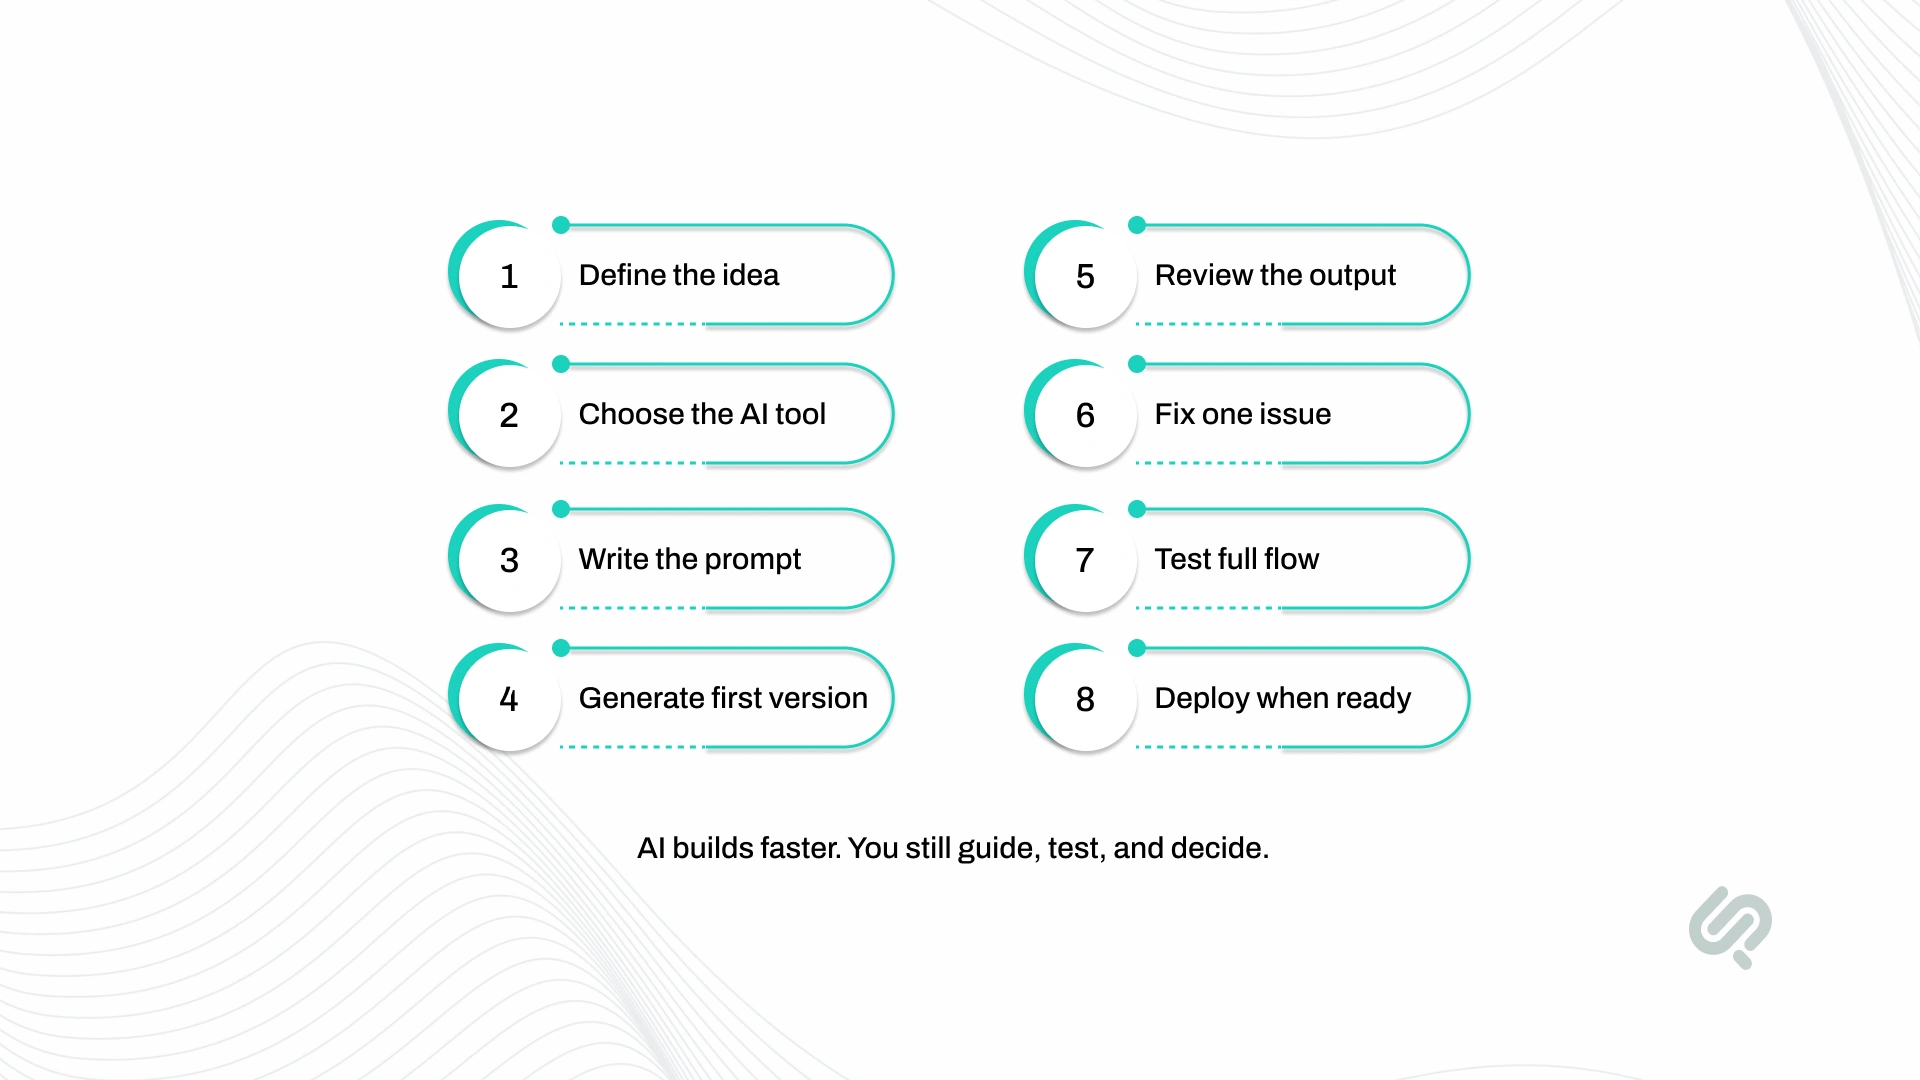
The easiest way to understand how to vibe code is to think of it as a build-test-fix loop.
You do not just type one prompt and get a finished product. You guide the AI through small steps, review the output, and keep improving it until the website or app works properly.
Here is the basic workflow:
Decide what you are building, who it is for, and what the first version must do.
Use a simple AI website builder for basic sites. Use tools like Cursor, Replit, Bolt.new, Lovable, or GitHub Copilot for more flexible builds.
Explain the goal, audience, pages or screens, features, design style, and what the AI should not include.
Let the AI create the starting point, but do not expect it to be perfect.
Check the layout, logic, responsiveness, errors, and missing details before asking for polish.
Use follow-up prompts for specific changes instead of asking the AI to fix everything at once.
Click every button, submit every form, test mobile screens, and check if data saves correctly.
A website or app should go live only after the main user journey works from start to finish.
Vibe coding works best when you treat AI like a fast assistant, not a final decision-maker.
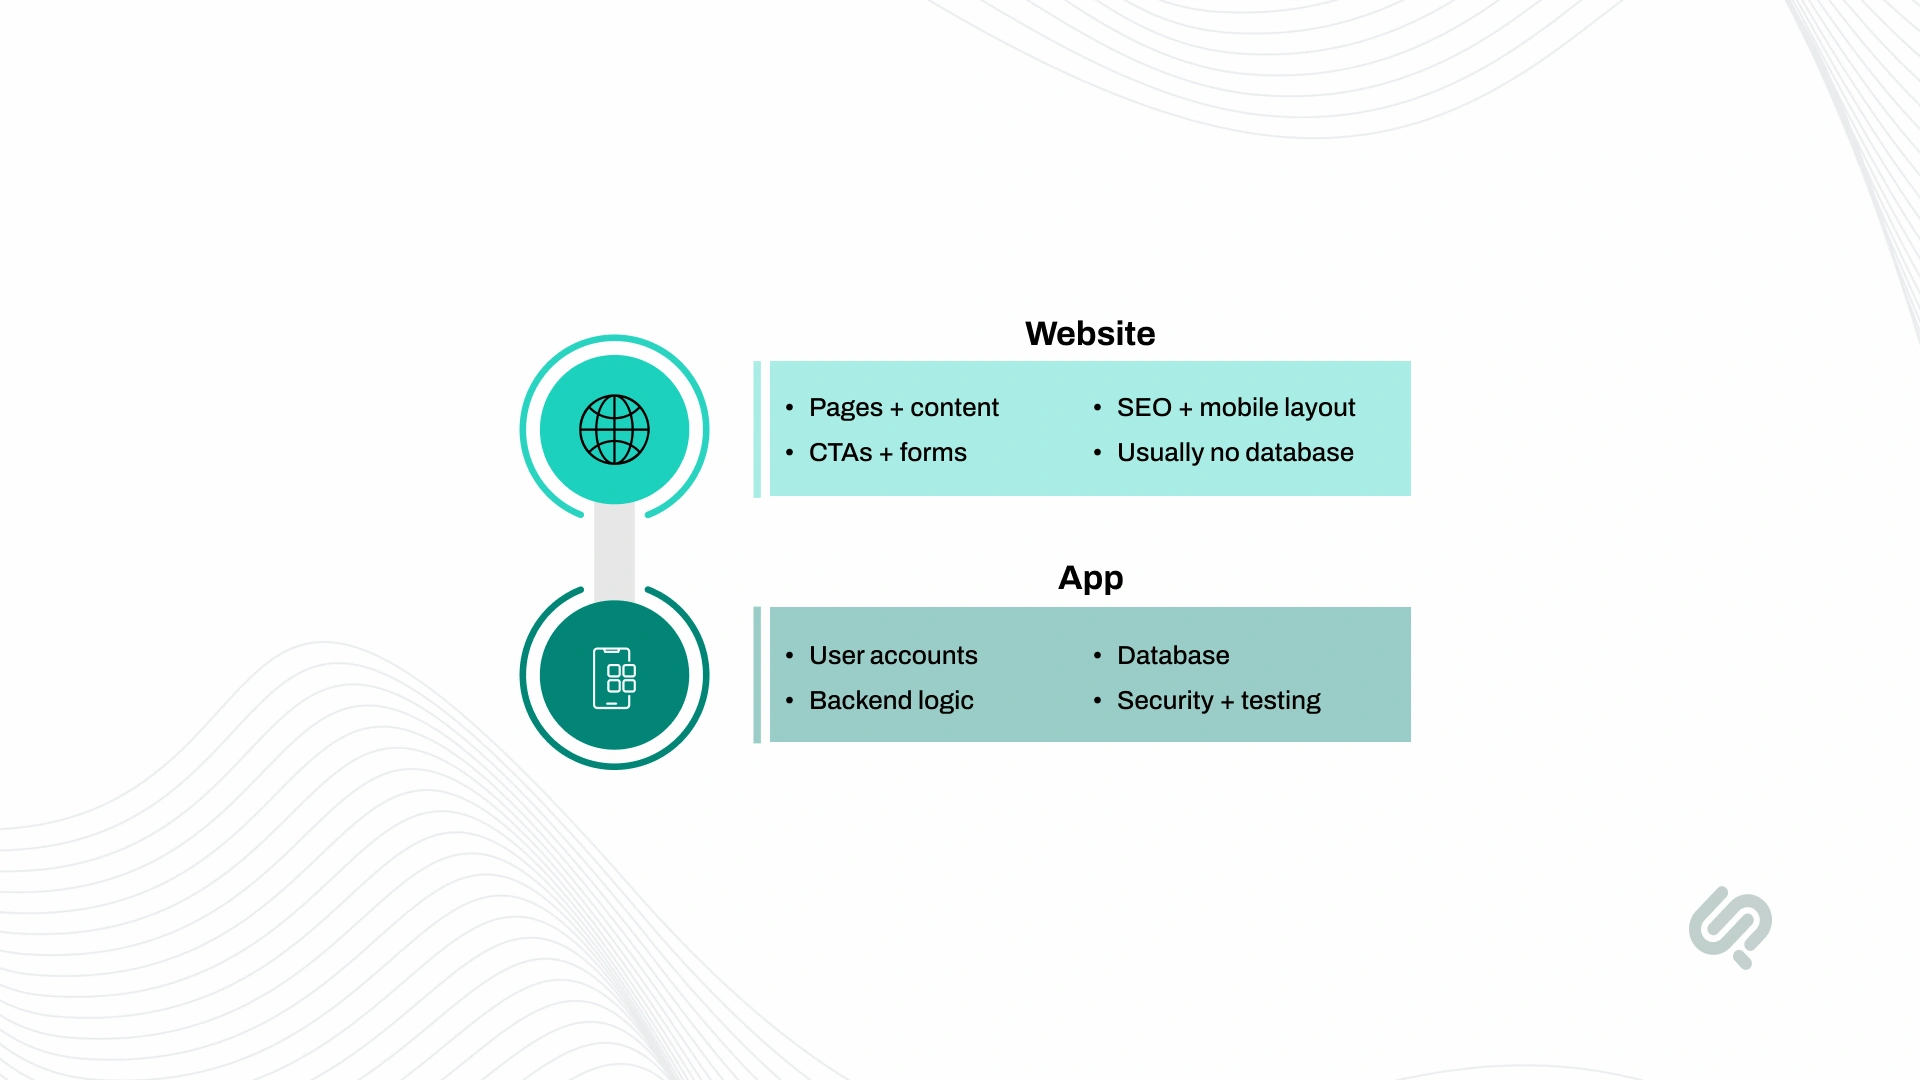
Before you start vibe coding, decide whether you are building a website or an app. The workflow is different.
A website is usually focused on pages, content, design, CTAs, forms, and SEO. An app is more complex because it usually includes user accounts, data, backend logic, permissions, integrations, and ongoing maintenance.
Use this quick comparison before choosing your tools:

Before you open an AI tool, plan the project in plain English. This does not need to be a long technical document. It just needs to be clear enough so that the AI does not guess.
Create a simple project brief with:
For a website, your plan may include a homepage, service section, CTA, contact form, SEO basics, and mobile layout.
For an app, your plan should include user login, dashboard, database, core action, settings, error states, and basic security rules.
This step matters because AI tools are fast, but they are not mind readers. A weak plan creates messy output. A clear plan gives the AI direction.
Abubakar Shams, CEO and vibe code expert at Phaedra Solutions, explains it clearly:
“Vibe coding works best when the idea is already structured. Before you ask AI to build, define the user flow, success criteria, and what should not be built yet. AI can move fast, but clear direction is what turns speed into a usable product.”
You do not need a complex setup to start vibe coding, but you do need the right tool for the type of project you want to build.
Use this simple guide:
If you are a beginner, start with an all-in-one tool. If you are building a serious product, use a proper codebase, version control, environment variables, and separate test data.
AI tools are now part of mainstream software development. Stack Overflow’s 2025 Developer Survey found that 84% of respondents use or plan to use AI tools, and 51% of professional developers use them daily. (2)
That does not mean every AI-generated build is production-ready. It means AI is now a normal part of the development workflow.
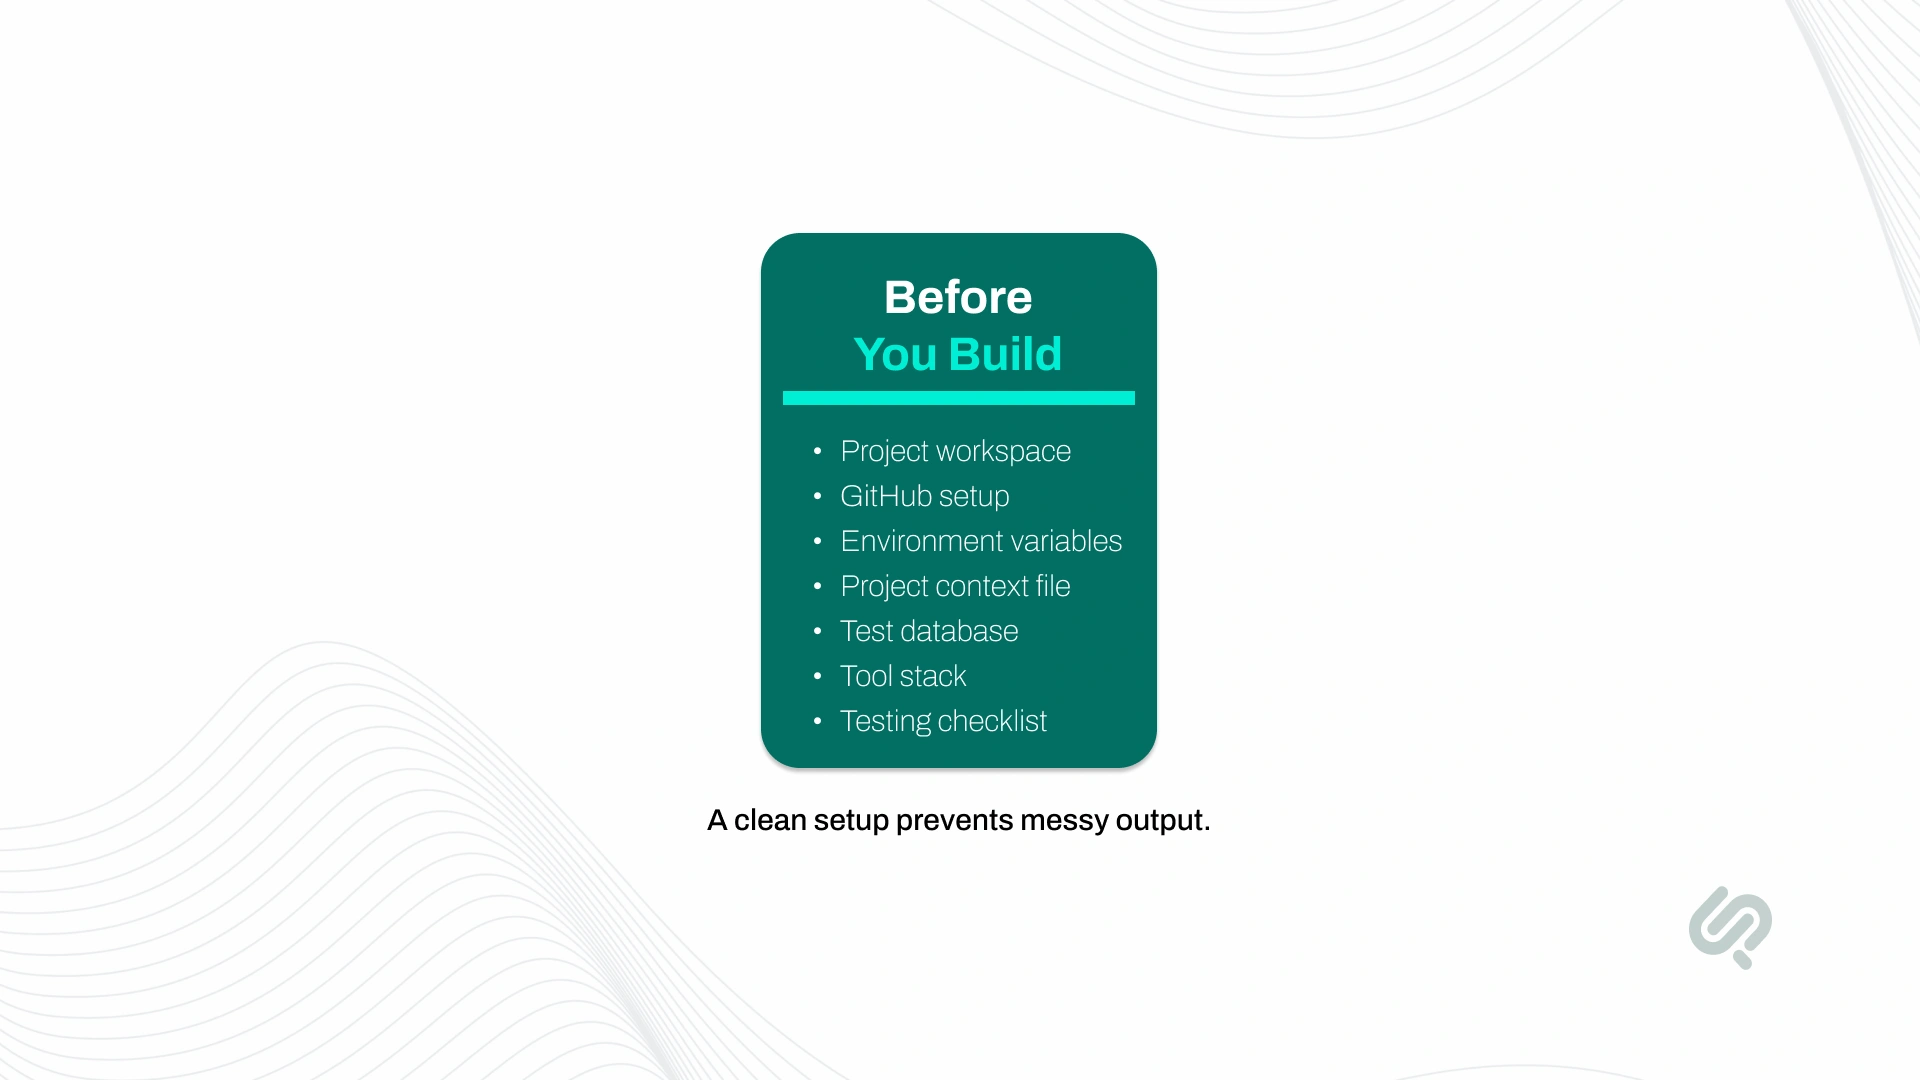
A clean setup makes vibe coding safer and easier to manage. It also helps you avoid losing working code when the AI breaks something.
Before you start building, set up these basics:
Keep your files, prompts, design notes, and decisions in one place. This helps the AI understand the project context and reduces inconsistent output.
Use GitHub to save working versions of your code. If an AI-generated change breaks the app, you can roll back instead of starting over.
Store API keys, database URLs, and secret tokens outside the code. Never paste private keys directly into frontend files or public repositories.
Add a simple file that explains:
In tools like Cursor, Claude Code, or Gemini CLI, this may work like a rules file, context file, or AGENTS.md-style instruction file.
Do not let AI tools experiment on real customer data. Use a test database until the app has been reviewed.
This setup may feel slower at first, but it prevents bigger problems later.
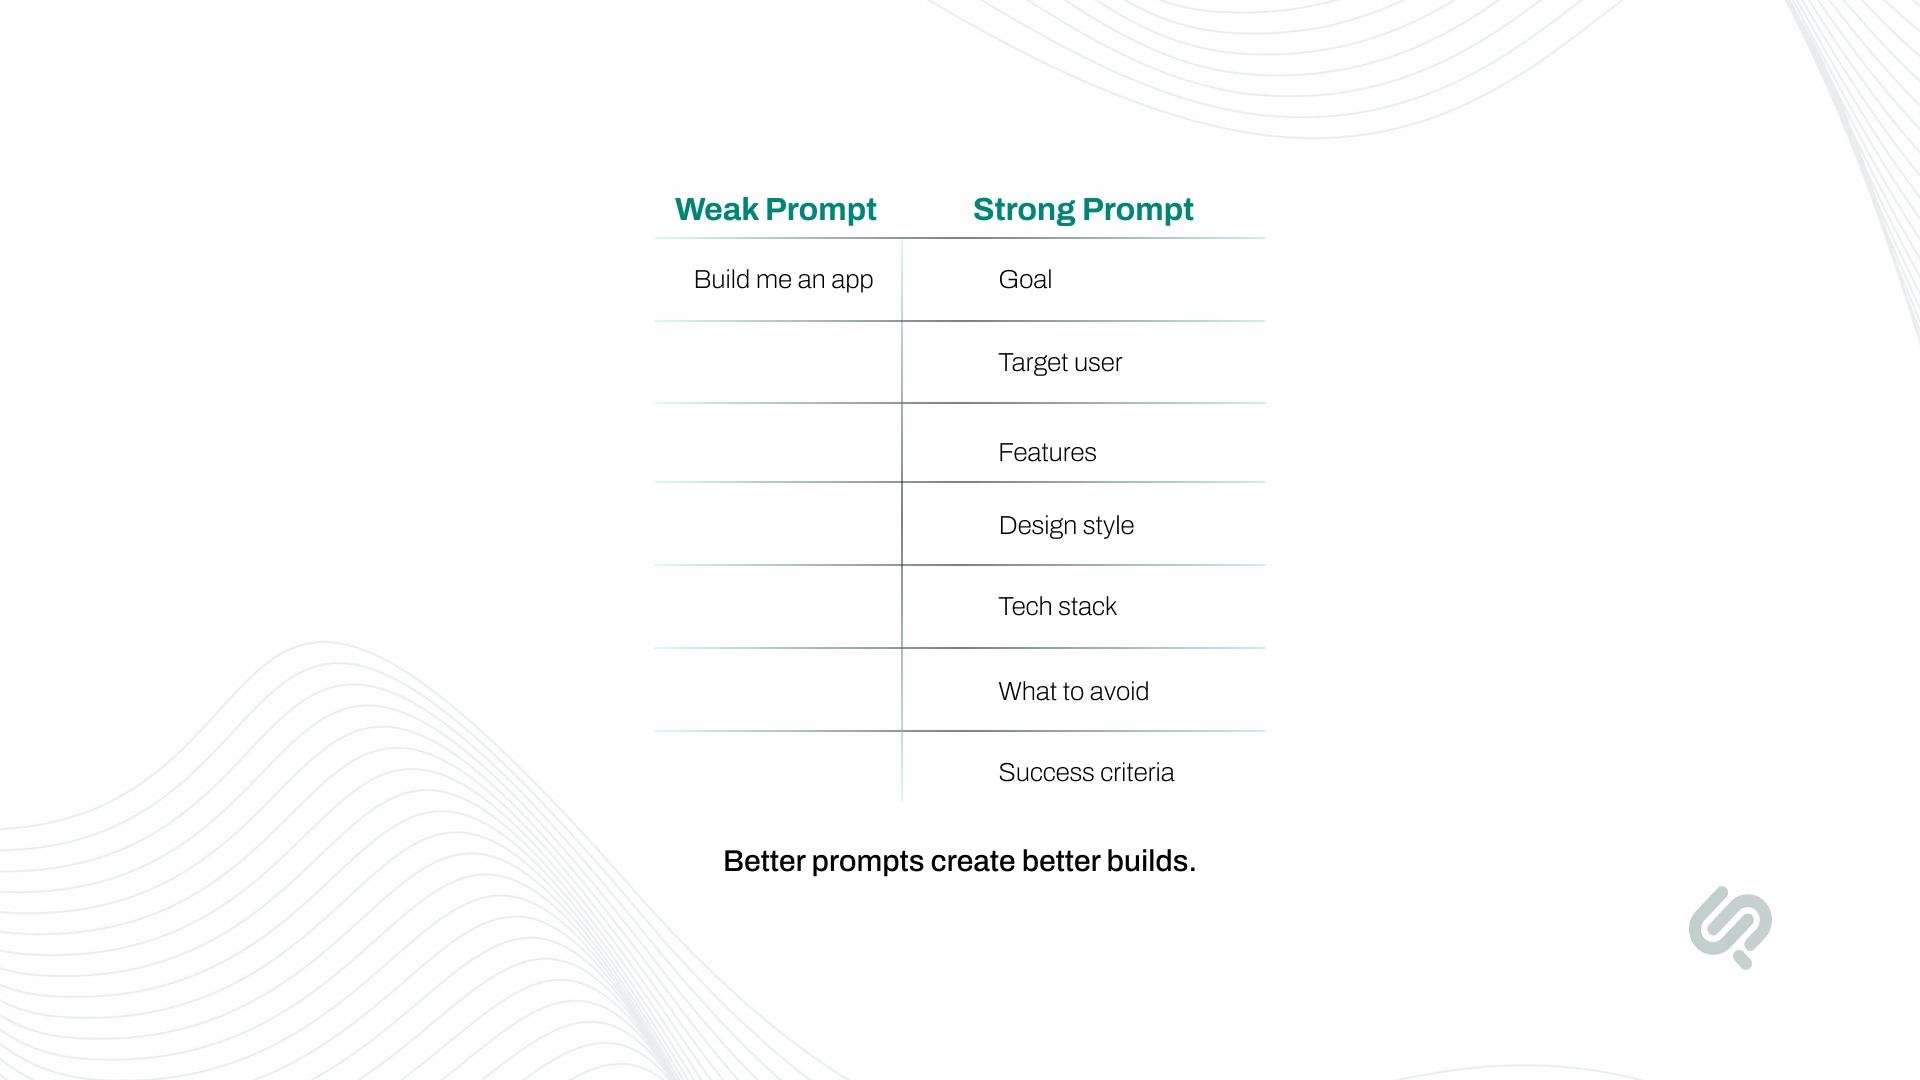
A good prompt gives AI context, boundaries, and a clear definition of success. A vague prompt gives you a vague build.
Use this structure when you want to build a website with AI or create an app with AI:
First, explain the project structure and plan before writing the full code.
First, explain the app structure before generating the code.
This prompt works because it tells the AI what to build, what to avoid, and how the final output should be tested.
A website is the simpler of the two builds. It's primarily design and content — pages, navigation, text, images, and basic interactivity. Here's how to do it properly.
Before you write a single prompt, answer these questions:
Write this down. It becomes the foundation of your first prompt.
Example first prompt for a landing page:
"Build a clean, modern landing page for a freelance graphic designer. It should have a hero section with a headline and CTA button, a portfolio section with 6 image placeholders, a services section with 3 service cards, and a contact form at the bottom. Use a black and white color scheme with one accent color."
Paste your prompt into your chosen tool. For a website, v0 by Vercel and Bolt.new both produce solid results from a single descriptive prompt.
What you'll typically get on the first pass:
Don't expect perfection on the first try. That's normal. The first generation is a starting point, not a finished product.
Before changing fonts, colors, or animations, check if the page structure works.
Look at the first version and ask:
Do not polish a broken layout. Fix the structure first, then improve the design.
A good follow-up prompt:
“Review this landing page like a UX designer. Check the section order, CTA placement, mobile layout, and clarity. Tell me what should be fixed before we improve the visual design.”
Now you iterate. Look at what was generated and identify what needs to change. Give specific follow-up prompts:
Be specific. "Make it look better" gives the AI nothing to work with. "Increase the card border-radius to 12px and add a subtle box shadow" gets results.
Replace placeholders with your actual text, images, and links. This is a manual step, paste in your bio, update the service descriptions, drop in real project images.
If you're writing the copy and it feels like a chore, you can prompt the AI:
"Write 3 short service descriptions for a freelance designer who specializes in brand identity, packaging design, and social media graphics."
Ask the AI to check responsiveness:
"Review the layout and make sure it works well on mobile screens. The navigation should collapse into a hamburger menu, and the portfolio grid should switch to a single column on screens under 768px."
Most AI builders handle this reasonably well out of the box, but it's worth reviewing. Open the preview in a narrow viewport and check every section.
For a standard website, the core functionality includes:
Prompt the AI for each one separately. Don't ask for five features in one prompt, you'll get messy code and conflicting logic.
This is one of the most commonly skipped steps in vibe coding. Don't skip it.
Ask the AI to:
"Add proper meta titles and descriptions to each page. Use semantic HTML — H1 for main headings, H2 for section headings. Add alt text to all images."
Also, ensure your page loads fast. Unnecessary animations, oversized images, and bloated libraries hurt performance. Tools like Google PageSpeed Insights or Lighthouse will flag issues.
Before deploying, test:
For deployment, the easiest options are Vercel, Netlify, or GitHub Pages, all free for personal projects. If you built in Bolt.new or Replit, you can deploy directly from within the tool.
Result: A fully functional, responsive website, live on the internet.
An app is a more complex build. It has backend logic, a database, user authentication, and state management. The workflow requires more planning and more iterative prompting. Take it step by step.
Start with the core problem your app solves. Then list only the features users need on day one, this is your MVP (minimum viable product).
Write a feature list:
Resist the temptation to add everything up front. Analysis paralysis kills more app ideas than bad code does. Build the core, then add features.
Before generating app screens, write the main user flow. This helps the AI understand how the app should work from start to finish.
Example for a task app:
New user signs up → lands on dashboard → creates a task → task is saved → task appears in the list → user edits the task → user marks it complete → user logs out → user logs back in and still sees the saved task.
This is better than saying “build a task app” because it gives the AI a real workflow.
Use this prompt:
Before building the app, turn this idea into 3 clear user flows: signup and login, creating a task, and editing or deleting a task. Keep the flows simple and only include version 1 functionality.
Once the user flow is clear, it becomes much easier to build, test, and debug the app.
Prompt your AI builder to create the key screens one at a time:
For apps, Bolt.new and Lovable are strong choices. Cursor is excellent if you're comfortable with a code editor.
Example prompt:
"Create a task management app. Start with the login screen, clean white background, centered card with email and password fields, a 'Sign In' button, and a link to the signup page. Use Tailwind CSS for styling."
This is where app development gets more complex than website building. You need to define how the app actually works:
Prompt the AI with specific logic requests:
"When a user clicks 'Add Task', save the task title, description, and due date to the database. Display the new task at the top of the task list without reloading the page."
If you're using a tool like Bolt.new, the AI often handles the full stack, it will write both the frontend and backend code. Review the logic it generates carefully.
Most apps need somewhere to store data. The most common options for vibe coders:
Prompt the AI:
"Set up Supabase as the database. Create a 'tasks' table with columns for id, user_id, title, description, due_date, and completed (boolean). Connect it to the app."
User login is non-negotiable for most apps. The two easiest approaches:
Prompt the AI:
"Implement Supabase Auth for user registration and login. After login, redirect users to the dashboard. Protect all app routes so they require authentication."
Test this thoroughly. Create a test account. Try logging in with the wrong credentials. Try accessing a protected route without logging in.
CRUD stands for Create, Read, Update, and Delete, the four basic operations of any data-driven app. Build each one separately:
Prompt the AI for each operation individually. Test each one before moving to the next.
Some apps need external services:
Each integration involves API keys. Store these as environment variables — never hardcode them directly in your source code.
AI-generated code can contain more issues if it is accepted without review. One report found that AI-written code produced around 1.7x more issues than human-written code, which is why testing and review matter before launch. (3)
Go through each user flow manually:
When something breaks, copy the error message and paste it directly into your AI tool:
"I'm getting this error: [paste error]. Here's the relevant code: [paste code]. What's wrong and how do I fix it?"
For most vibe-coded apps:
Walk through your deployment checklist:
Your app isn't done when it deploys — it's done when users stop using it. After launch:
Result: A fully functional web app — with authentication, a real database, and working features.

Yes, but only if you treat the AI-generated version as a starting point, not the final product.
Vibe coding is useful for:
But a real business product needs more than generated code. It needs:
This is where AI web development becomes important. The AI can help you move fast, but a technical team helps you make the product safe, stable, and ready for users.
GitHub’s enterprise research also shows that AI coding tools are becoming central to software development and can improve productivity, but the value still depends on how teams review, govern, and ship the code. (4)
Vibe coding can save time, but it can also create messy code, weak security, and broken workflows if you move too fast.
Avoid these mistakes:
“Make me an app” is not a useful prompt. Explain the goal, user, features, style, pages, data, and success criteria.
Better prompt:
“Build a simple booking app for a fitness coach. Users should choose a time slot, enter their name and email, and submit a booking request. Do not add payments yet.”
Do not ask AI to build login, payments, dashboard, notifications, settings, and mobile support in one prompt.
Build one workflow at a time. Test it. Then move to the next feature.
Always save working versions in GitHub. If the AI breaks something, you need a rollback point.
This is especially important for apps, because one change can break authentication, database logic, or routing.
Check database rules, API keys, authentication, protected routes, and user data access before launch.
This matters because security mistakes are common in AI-generated apps. For example, reports around Lovable-generated apps have highlighted critical row-level security flaws in Supabase configurations, showing why database permissions must be reviewed carefully. (5)
Do not only test what should work. Test what might break.
Check:
Never test AI-generated changes on real customer data. Use a test database until the app has been reviewed.
Andrej Karpathy has also warned developers to “keep AI on the leash,” because AI can still make mistakes that humans would not. That is why you should review changes before accepting them, especially when they affect security, data, or payments. (6)
AI can generate code that looks correct but fails in real use. Review changes before accepting them, especially if they affect authentication, payments, database access, or security.
Once the first version works, optimize it before launch. This is where a quick AI build starts becoming a usable product.
Before publishing a website, check:
A website can look good and still fail if it loads slowly, breaks on mobile, or has unclear messaging.
Before launching an app, check:
For apps, optimization is not just about speed. It is about security, reliability, and making sure users can complete the main workflow without confusion.
Small changes in how you prompt, test, and review can make a big difference.
Do not just say, “Add a button.”
Say:
Add a primary CTA button in the hero section. The text should say “Get a Free Quote.” It should link to the contact form and be visible on mobile.
The more context you give, the better the result.
Maintain a short document with:
Paste this into new AI sessions so the tool does not lose context.
Do not only say “add authentication.”
Describe the full flow:
‘A new user signs up → confirms email → logs in → lands on dashboard → logs out → cannot access dashboard unless logged in again.’
This helps the AI build a complete experience instead of disconnected features.
You do not need to become a full developer, but you should understand basic concepts like components, routes, databases, APIs, environment variables, and authentication.
This makes you much better at spotting weak or broken AI output.
Push stable versions to GitHub regularly. When an AI update breaks something, you can go back to the last working version instead of rebuilding from scratch.
Vibe coding will keep getting faster, more visual, and more agent-driven. Instead of prompting for one feature at a time, users will increasingly describe a product goal and let AI agents plan, build, test, and deploy larger parts of the project.
But the fundamentals will not change.
Good vibe coding will still depend on:
AI will make software easier to start. It will not remove the need to build it properly.
Vibe coding is a great way to move from idea to prototype fast. But once your website or app needs real users, secure data, clean code, scalable architecture, and reliable performance, prompts alone are not enough.
That is where Phaedra Solutions can help.
Our vibe code development services help founders, startups, and growing teams turn AI-generated prototypes into launch-ready websites and apps. We review what AI has built, fix weak code, improve user flows, secure the backend, optimize performance, and rebuild what needs to be rebuilt properly.
You do not need to throw away your AI-generated idea. You need to make it stable, secure, and ready for real users.
Book a Vibe Code Development Consultation.
Let’s review your idea, prototype, or existing AI-generated build and show you the safest path to launch.


1.https://www.collinsdictionary.com/woty
2.https://survey.stackoverflow.co/2025/ai
4.https://github.com/resources/whitepapers/enterprise-octoverse
5.https://www.rocket.new/blog/rocket-new-vs-lovable-for-complex-backend-logic-which-wins
6.https://www.businessinsider.com/openai-cofounder-andrej-karpathy-keep-ai-on-the-leash-2025-6

Ameena is a content writer with a background in International Relations, blending academic insight with SEO-driven writing experience. She has written extensively in the academic space and contributed blog content for various platforms.
Her interests lie in human rights, conflict resolution, and emerging technologies in global policy. Outside of work, she enjoys reading fiction, exploring AI as a hobby, and learning how digital systems shape society.